

PowerTab "Startup" Tutorial. |
This quick
guide is geared towards someone wanting to quickly get to grips with
the basics of PowerTab for tabbing the style of guitar that this
site is all about. PowerTab is totally free to use and fully functional, not a demo with restrictions that requires £/$ to register and "activate". It's a pretty powerful tool, with capabilities you may not even need/want/use, so can look a little daunting at first. Don't worry about that though, if you just want to use the basic "TABbing" tools you can be up and running in no time! |
The Interface Along the top you have a bunch of drop-down menus, under that a couple of toolbars and the playback control. The main page obviously contains the score and tablature. Along the bottom are some buttons that let you determine note or rest length/duration. As
with most software you'll find "tooltips" telling you what a button
does, many of the buttons access functions that you can also get
to via the drop-downs, so it's quite flexible to use. |
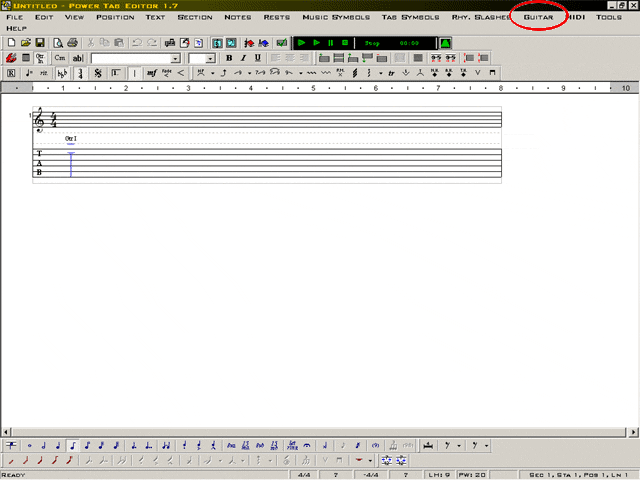
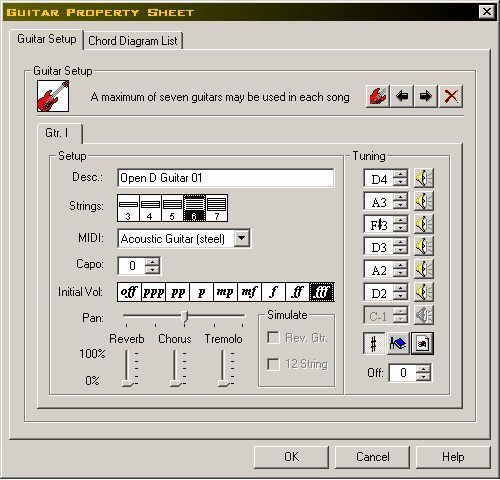
Set up your guitar On the drop-down menu at the top, click on Guitar/Setup. ( see above, circled in red ) This opens the Guitar Setup Dialog Box / Guitar Property Sheet, which looks like this:
This is pretty self-explanatory. Here you can name your setup, choose the tuning, number of strings, playback sound etc. Use each string's up & down buttons to change the tuning, click the audio button to hear it, if you want a referance tone... A nice touch is that there's a Tuning Library that you get to by clicking the little tuning-fork & book button. The button next to that saves your current setup as the default. |
Now Get Tabbing! First-off we're going to get a bit more familiar with the main page itself... Click
on one of the tab lines on the main page. By clicking anywhere on the TAB, you are able to place notes anywhere you like along the TAB lines by clicking on the required string's line & typing a number there. When
you navigate backwards & forwards using the arrow keys, the
cursor moves in steps the same length as the note or rest that
you have
currently selected. With your
mouse-pointer, click the note button on your bottom toolbar. |
Right, on with the TABbing! Get your cursor on the bottom string/line, right at the beginning, and enter a "zero". Then use
your cursor and numeral keys thusly: Repeat this until you have eight of these notes placed on you tab. Congratulations!
You just PowerTabbed your first bar! But don't go and spoil it all by playing back yet, there's some more to do... |
Now
get
your cursor back to the beginning, either by cursor-keying, or
just click on it. This
time we want the top string, highest tab-line selected. Then key right until your cursor coincides vertically with the 3rd bass note, enter a zero on your top string. Advance to the 5th bass note & enter a zero on the 2nd string. Follow this with a zero on the 1st string that coincides with the penultimate 7th of our 8 bass notes. Then
select all your tabbed notes by clicking on the first one & dragging
right to the end, then click "let ring" on your bottom toolbar. Before we listen to this, just a final touch... Select the first note on the top string, the "4", with your cursor. Then
click the button that's about halfway along the lower toolbar at
the top, which looks like "/9".
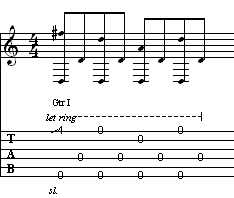
You should end up with something like this:
Now hit the playback button to hear your creation... Yep, you just tabbed the first bar of that I'll Fly Away/"O Brother" tune!
To carry on, insert a bar-line ( it's 1/3 along the lower top toolbar ) and off you go... When you get towards the end of your first line of tab, you'll run out of space in which to finish the 4th bar. To
fit the full 4 bars on the line, use the top drop-down menu,
( click Section/Position Width ) to adjust the spacing. Then on your top drop-down menu, click Section/New Section to continue on a new line of tab. Investigate the bar-line options to set repeat points etc. You can save your work as PowerTab (.ptb) files, print, or export different files depending on what you're doing... Take a little time to explore, there's always "undo"! You can even import midi files to arrange as tabs... There's
an "official" Getting Started Tutorial and other stuff on the PowerTab
site which is worth checking out...
|
 ...
...
 here
here